MyMapMaker
My Map Maker is a small startup business that began in 2020. It is an online platform that provides users with a tool to craft event maps. Users no longer have to draw or create maps from scratch. The map making process is meant to be very easy, consisting of clicking or dragging icons onto a blank or templated canvas. Every map is 100% customizable.
Project Overview
PROBLEM
As a new start up business, My Map Maker is in need of a digital space. They need to refine their brand identity, and create a website that flows smoothly for their users to successfully create custom maps.
SOLUTION
I spoke with the stakeholders about their vision and brand message for their website. The main priority was to create a digital space for users to have fun creating custom maps. As a result, I have helped fine tune their brand identity and designed a responsive website.
ROLE
User Research, Branding, End-to-end UX/UI Designer, Prototyping, Usability Testing, Iterations
TIME
80 hours
TOOLS
Figma, Maze
Design Process
EMPATHIZE
Research
I first met with the four stakeholders on a Zoom call to better understand their business background, needs, wants, and goals.
Stakeholders’ desires:
Provide a fun, creative, and inviting website for users to create custom maps for special events.
Cater to both professional event planners and one time event planners in theirs 20s-40s.
Refine their brand identity.
Build a community of artists that see us as a benevolent avenue to create and sell their designs.
Competitive Research
I conducted a competitive analysis of other direct and indirect competitors of My Map Maker to better understand the current marketplace.
User Interviews
Research goals:
Discover motivations, pain points, and needs of current industry professionals (event planners) when creating custom maps for events, so we understand what users need when navigating our digital platform.
Discover users motivations, pain points, and needs when navigating a new creative platform, to provide a seamless and positive experience.
I conducted 5 user interviews (2 professional event planners and 3 non-event planners) in person and remotely to learn about users’ motivations, needs, and pain points.
Click here to read detailed interview data.
User Interview Insights:
Users’ motivations: maps provide a quick, effective visual communication
Users’ needs: upload own images feature, landmark icons, quick and easy process
Users’ pain points: learning curve when using a new creative platform, and time consuming
DEFINE
Defining the Problem
User Persona and Empathy Map
With all the interview findings and analysis, I created 2 user personas because the first user is the regular My Map Maker user, while the second user is the one time user.
1) Emily Johnson - the industry professional/regular user
2) Eveline Cho - the bride (non industry professional)/one-time user
I then created an empathy map for both users to deeper empathize with My Map Maker’s potential users. I continually referred back to Emily and Eveline during the design process in order to meet their goals, needs, and frustrations.
Synthesizing the research information helped me further define the problem, and come up with a solution plan. I first made a feature roadmap that narrowed down the components necessary for the project design.
I referred to the feature roadmap and my initial stakeholder meeting notes to create a clear site map to help visualize the structure of the design.
Site Map:
IDEATE
Ideating Solutions
How can we create a smooth, fun, and easy process for My Map Maker’s users? In order to create a design that meets users’ needs, I created a task flow and user flow that detailed each step of the main process.
Task Flow:
The task flow helped organize the necessary steps and key pages needed to complete the main task—creating a new map.
User Flow
Before wireframing, I created a user flow to further organize the key pages I would need to design the screens.
Sketches & Wireframes
I began sketching a variety of homepage screens, taking into consideration the pieces of information gathered up until this point.
I began digitizing low-fidelity wireframes. Shown below are some examples of the responsive wireframes for My Map Maker.
Branding
As a startup, My Map Maker needed some refining of their brand identity. Using the company’s branding goal, aiming for a “fun, creative, and inviting” brand, I created a moodboard and then developed 3 different style tiles.
After speaking with the stakeholders, we decided to move forward with Style Tile 3 to represent their brand.
UI Design
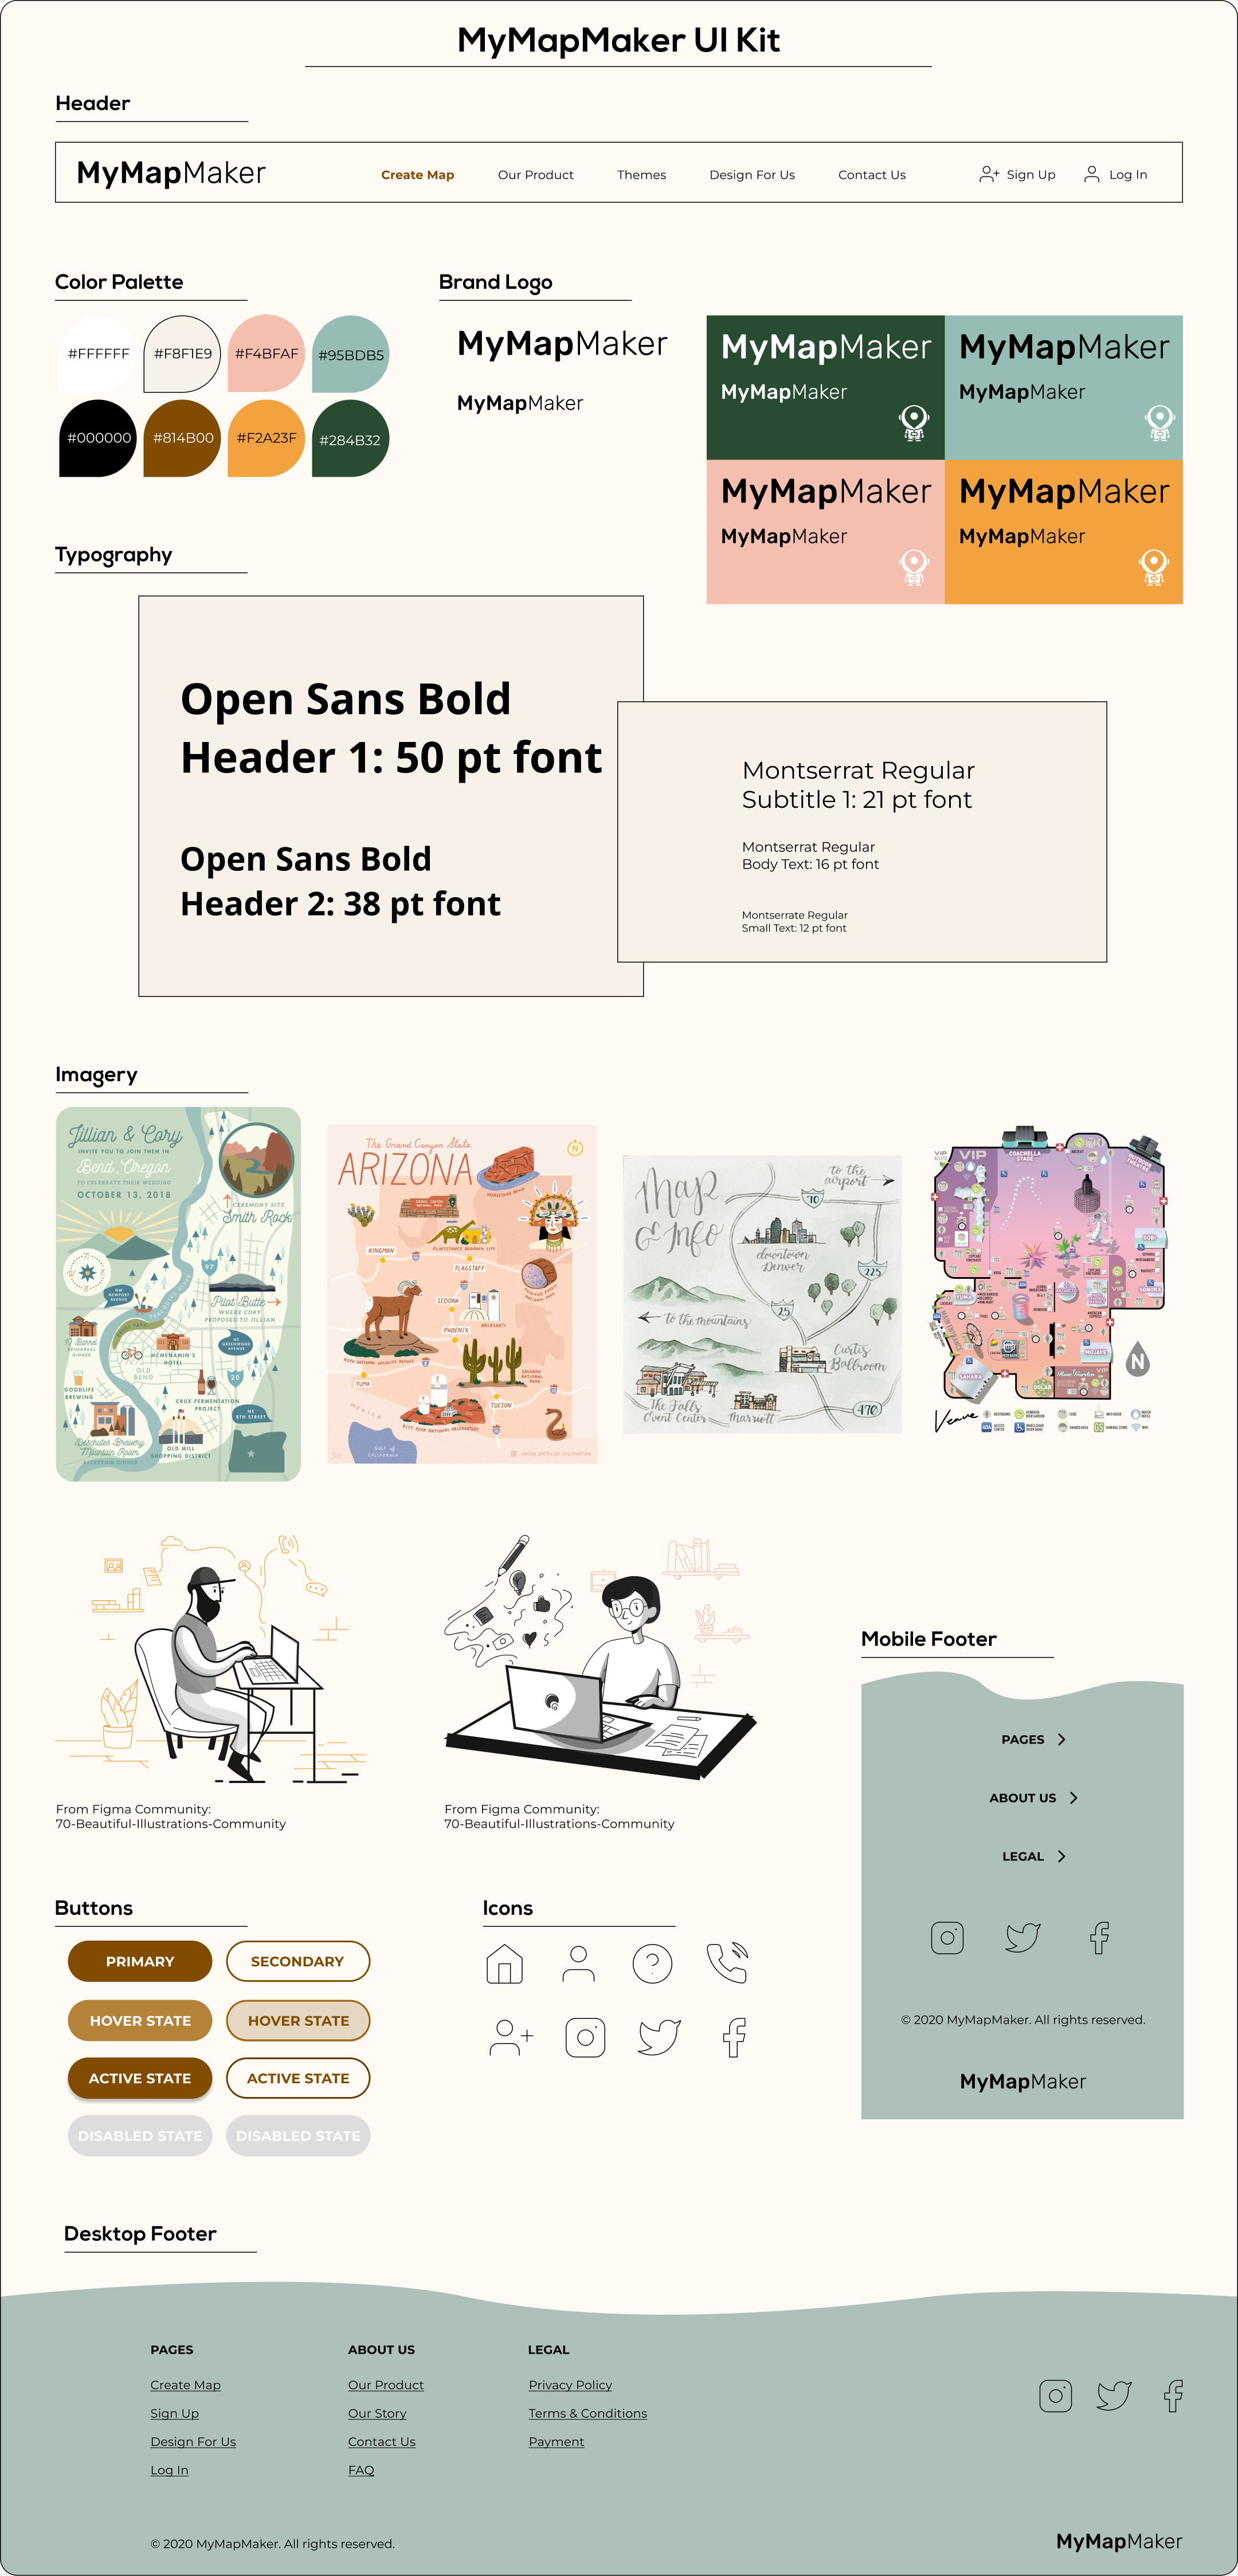
Using the elements from the brand style tile, I created a UI Kit.
PROTOTYPE
Desktop Prototype
I built an interactive prototype with limited functionality to be used for usability testing in the next step.
The prototype is to complete 4 main tasks:
Create a new map (with an existing log in)
Choose a wedding template
Search for/add a wedding icon
Check out
TEST & ITERATE
Testing the Prototype
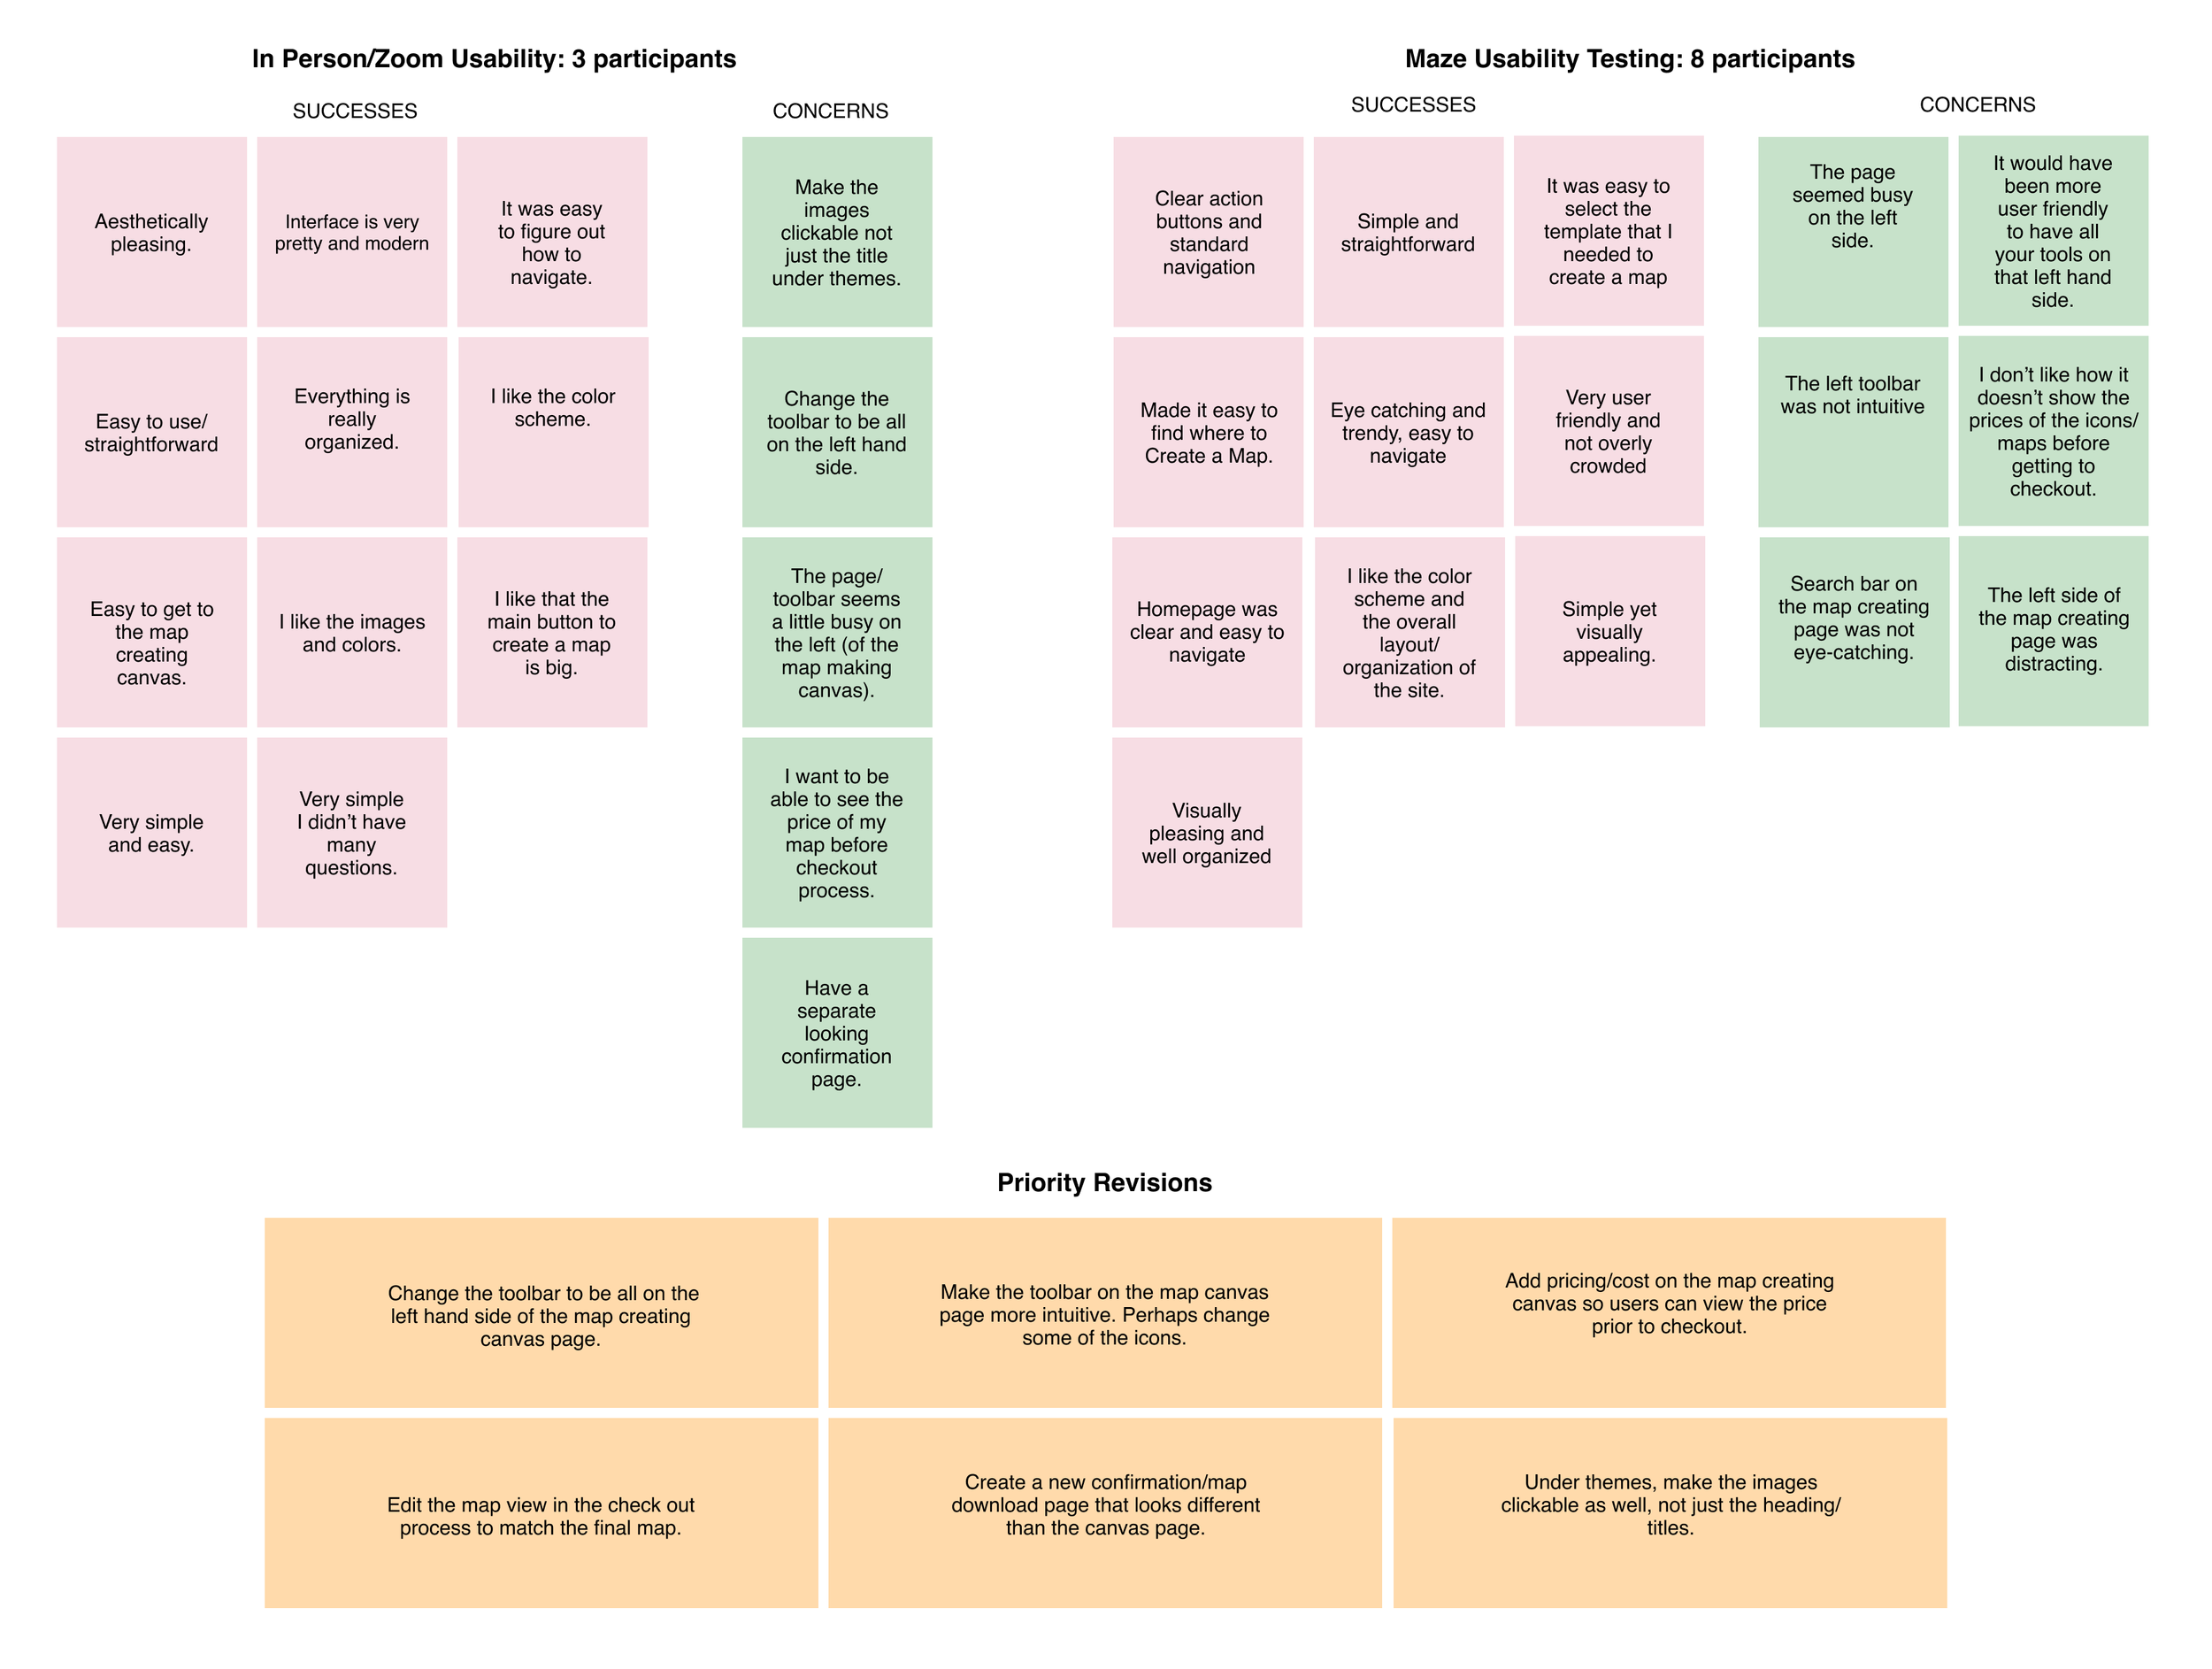
Usability Testing & Affinity Map
Usability testing on 3 participants in person and over Zoom
8 participants using Maze
I gathered, analyzed, and organized the information onto an affinity map with direct quotes from participants. I was able to discover various patterns that validated the strengths of my design, as well as areas for improvement.
Click here to view further usability testing data details.
Priority Iterations
Testing clearly showed me ways to iterate on the design to better meet users’ needs. Shown below are some of these priority changes.
Final Prototype
Reflection & Conclusion
REFLECTION
I gained real life experience and so much insight working with My Map Maker. I was able to see the importance of clear communication with the stakeholders. Testing also helped me to back up my reasoning for various UX choices. The testing also helped me as a designer to validate areas of strength and areas that needed iterating.
NEXT STEPS
Because the company is in the process of working with a new developer, my next step is handing-off the design to the stakeholders and developer. Once the product is built, it would then launch. I would repeatedly test the responsive designs to ensure users are satisfied.


